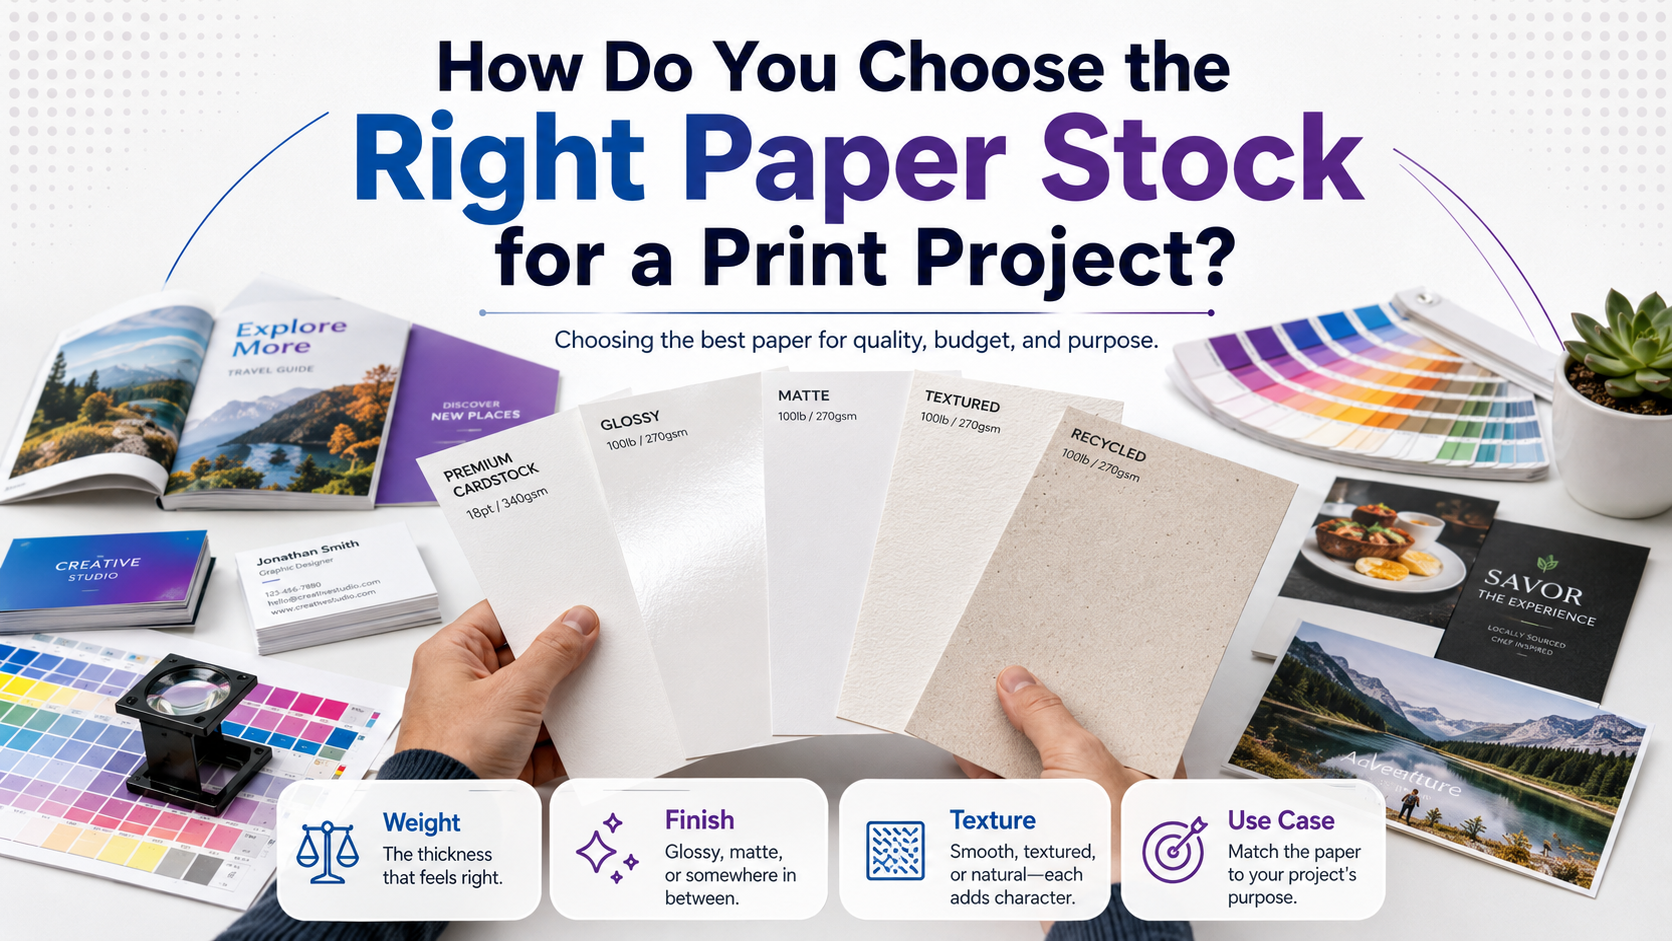
How Do You Choose the Right Paper Stock for a Print Project?
Choosing the right paper stock for a print project determines the final quality, durability, and visual appeal of your printed materials. This comprehensive guide walks you through selecting the optimal printing substrate in 30-45 minutes with intermediate skill level required. According to the Paper and Paperboard Packaging Environmental Council (2024), proper paper selection reduces printing costs by 15-30% and ensures professional print output quality.
Before You Begin

Prerequisites and Materials Needed:
- Project specifications document (size, quantity, purpose)
- Printing requirements outline (digital printing or offset printing method)
- Budget allocation worksheet
- Access to paper manufacturer catalogs or paper supplier websites
- Understanding of end use requirements for your printed materials
- Knowledge of your printing press capabilities or printer specifications
Step 1: Define Your Print Project Requirements and Applications

Identify the specific printing applications for your project before selecting any printing material. Business cards require different paper attributes than brochures, posters, or catalogs. Document these project specifications in detail to guide your substrate selection process.
Categorize Your Print Medium by Type
Common printing media categories include business cards, letterhead, envelopes, flyers, magazines, books, postcards, packaging, and labels. Each category demands specific paper performance characteristics. For example, business cards typically use cover weight paper between 80-110 lb (300-400 GSM), while brochures often require text weight paper ranging from 60-100 lb (90-150 GSM).
Marketing materials such as flyers and posters benefit from glossy finish paper that enhances color saturation, whereas letterhead and envelopes require uncoated paper with good ink absorption rate for writing purposes. According to the Printing Industries of America (2024), matching paper type to application improves print reproduction by 40%.
Determine Quantity and Timeline
Large-volume projects exceeding 5,000 units favor offset paper optimized for offset printing, while smaller runs under 500 units work better with bond paper suitable for digital printing. Your printing technique compatibility affects both paper cost factors and material choice significantly.
Step 2: Understand Paper Weight and Thickness Standards
Paper weight represents one of the most critical paper selection criteria. Two measurement systems exist: GSM (grams per square meter) used internationally and pounds (lb) used primarily in North America. Understanding both systems helps when reviewing paper specifications from different paper mills.
GSM Measurement and Paper Density
GSM measures paper density by weighing one square meter of paper stock. Standard ranges include lightweight (35-90 GSM) for newsprint and standard office documents, medium weight (90-170 GSM) for brochures and flyers, and heavyweight (170-400+ GSM) for business cards and packaging. A gsm measurement of 300 equals approximately 110 lb cover stock.
Paper Weight Guide: Text vs. Cover Weight
| Paper Category | Weight Range (lb) | GSM Range | Common Applications |
|---|---|---|---|
| Text Weight Paper | 20-100 lb | 75-150 GSM | Letterhead, brochures, catalogs, magazines |
| Cover Weight Paper | 65-130 lb | 176-350 GSM | Business cards, postcards, book covers |
| Cardstock | 80-130+ lb | 216-350+ GSM | Invitations, premium brochures, packaging |
Paper caliper measures actual paper thickness in thousandths of an inch (mils or points). A standard business card uses cardstock weight between 14-16 point caliper. Always verify paper thickness gauge specifications match your printer capabilities to prevent feeding issues.
Step 3: Evaluate Paper Finish Options and Surface Characteristics
Paper finish types dramatically affect printing surface performance, tactile qualities, and visual presentation. The three primary finish types include coated paper, uncoated paper, and specialty textures like silk paper, linen paper, and laid paper.
Coated vs Uncoated Paper Selection
Coated paper features a clay coating that creates a smooth printing surface with excellent ink holdout and minimal dot gain. This coating reduces ink absorption rate, producing sharper images and more vibrant color gamut. Uncoated paper lacks coating, offering superior writability and a natural, tactile paper texture preferred for letterhead and envelopes.
Glossy vs Matte Finish Comparison
Glossy finish paper reflects light, creating maximum color saturation and visual impact ideal for photography, posters, and marketing materials requiring vibrant colors. According to testing by the Graphic Arts Technical Foundation (2024), glossy coated paper enhances color density by 35% compared to uncoated alternatives.
Matte finish paper provides a non-reflective surface that reduces glare and works better for text-heavy documents, catalogs, and books. Satin finish offers a middle ground with subtle sheen and smooth paper surface characteristics. Silk finish paper characteristics include soft touch and elegant appearance favored for luxury paper stock options and premium brochures.
Specialty Paper Texture Options
Linen paper features a textured surface mimicking fabric, ideal for high-end business cards and invitations. Laid paper shows distinctive linear texture from manufacturing, while vellum paper offers translucent properties. Parchment paper provides aged appearance for certificates and formal documents.
Step 4: Consider Paper Brightness and Opacity Ratings
Paper brightness measures light reflectance on a scale from 0-100, with higher numbers indicating whiter, brighter paper. Standard brightness levels range from 84-100 for virgin paper and 80-92 for recycled paper options.
Paper Brightness Levels for Color Printing
Brightness levels between 92-98 provide optimal color reproduction and contrast for full-color printing. Paper whiteness above 95 brightness works best for photographs and marketing materials requiring vibrant colors. Lower brightness (80-90) suits text-heavy documents where warmth and reduced eye strain matter more than color vibrancy.
Understanding Paper Opacity Factors
Paper opacity prevents show-through when printing double-sided documents. Opacity ratings range from 0-100%, with 95%+ recommended for double-sided printing. Thicker paper stock naturally provides better opacity, but paper composition including fillers and sizing also affects transparency. Magazines and catalogs require minimum 90% opacity to prevent text bleeding through pages.
Step 5: Assess Budget and Environmental Considerations
Balance cost considerations with environmental considerations and paper quality to optimize your material choice. Paper costs typically represent 25-35% of total printing expenses according to industry data from 2024.
Budget-Friendly Paper Stock Options
Standard offset paper and uncoated bond paper uses offer budget-friendly paper stock alternatives for high-volume projects. Text weight in 20-24 lb (75-90 GSM) provides the lowest cost per sheet. However, cheap paper may increase ink consumption by 20-30%, offsetting initial savings.
Sustainable Paper and Eco-Friendly Options
Recycled paper manufactured from post-consumer waste reduces environmental impact by 35-50% compared to virgin paper according to Environmental Paper Network (2024). FSC certification verifies responsible paper manufacturing from sustainably managed forests. FSC certified paper selection ensures chain-of-custody tracking from paper mill to final product.
Eco-friendly options include recycled paper options with 30-100% post-consumer content, tree-free papers from agricultural waste, and chlorine-free bleaching process alternatives. Premium paper stock with environmental certifications costs 10-25% more than conventional virgin fiber paper but appeals to environmentally conscious audiences.
Step 6: Request Samples from Paper Suppliers
Contact paper suppliers or work with your commercial printing partner to obtain physical samples. Most paper manufacturers provide sample books showcasing their complete product line including different paper weight selection, finish selection, and texture options.
Evaluate Paper Samples Systematically
Test paper smoothness by touch, assess paper absorbency with pen or marker, and evaluate paper grain direction by folding samples. Paper grain runs parallel to manufacturing direction and affects folding characteristics and binding compatibility. Always fold with the grain to prevent cracking, especially with cardstock weight above 80 lb.
Compare samples under different lighting conditions to judge paper aesthetics and color rendering. Review the commercial print paper stock guide for detailed specifications on professional paper options. Examine how ink sits on the surface to predict ink holdout and color gamut performance.
Step 7: Conduct Test Prints Before Final Production
Order small test quantities (50-100 sheets) of your selected paper stock for proof printing. Test prints reveal how your specific design, images, and text perform on the chosen printing substrate before committing to large-volume production.
Evaluate Test Print Results
Assess color saturation, sharpness, and overall print quality factors on your test prints. Verify paper compatibility with your selected printing press and check for issues like excessive dot gain, poor ink absorption, or feeding problems. Digital printing and offset printing produce different results on identical paper stock due to varying printing technique compatibility.
Test folding, creasing, and any finishing operations planned for your project. Heavy cover stock may crack when folded against the grain. Coated papers require scoring before folding to prevent surface cracking on pieces like brochures and postcards.
Troubleshooting Common Paper Selection Issues
If colors appear dull or washed out: Switch to coated glossy paper with brightness rating above 94 for better color saturation and vibrancy.
If text bleeds through to the reverse side: Select paper with higher opacity (95%+) or increase paper weight by one category (e.g., from 60 lb to 80 lb text weight).
If paper jams occur in your printer: Verify paper caliper matches printer specifications and ensure paper density falls within recommended ranges. Some digital printers cannot handle cardstock above 300 GSM.
If budget exceeds allocation: Consider standard offset paper, reduce paper weight where appropriate, or switch from coated to uncoated stock while maintaining adequate paper quality for your application.
If writing smears on finished prints: Uncoated paper provides better ink absorption for writing instruments. Replace glossy or coated paper with matte or uncoated alternatives for documents requiring handwritten notes.
If paper curls after printing: Match paper grain direction to printing direction and ensure proper humidity control during production. Coated papers are more prone to curling with heavy ink coverage.
Next Steps: Finalizing Your Paper Stock Decision
After completing test prints and evaluating all paper selection criteria, finalize your stock selection by documenting complete paper specifications including weight, finish, brightness, opacity, and manufacturer details. Share these specifications with your printing press operator or commercial printing provider to ensure consistent results across print runs.
Establish a relationship with reliable paper suppliers for future projects and maintain sample archives of successful paper choices for reference. Consider ordering slightly more paper than needed (5-10% overage) to account for spoilage during printing, cutting, and finishing operations.
For ongoing print needs, negotiate volume pricing with paper manufacturers and maintain consistent paper stock choices across related materials (business cards, letterhead, envelopes) to strengthen brand identity and streamline ordering processes. Monitor paper sustainability ratings and certifications as environmental standards evolve to ensure your material choices align with corporate responsibility goals and customer expectations.