5 Design Tips to Help You Create Print-Ready Files
Submitting your design files to be converted to print can be a tricky process. While your files may look great on your computer, they may not translate the same on print. Here are five design tips to help you ensure that your files are print-ready.
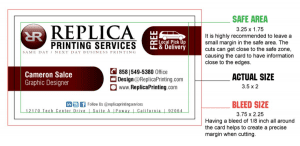
1. Make Sure You Place Your Design in the Safe Zone
When creating a design for print, it is important to recognize the safe area and the bleed size. The safe zone is the ⅛-inch margin of space between your design and the actual size of the paper. Having important text or elements of your design be placed outside of the safe zone can lead your design to be cut off during production. In addition to the safe zone, you want to determine whether your desired print will be “full-bleed” or “no-bleed”. Full-bleed occurs when your print extends to the edge of the page and requires an additional ⅛ inch margin around the actual size of your print. Having your print be produced with no bleed will create a border around your design. Understanding the safe area and bleed size will help you set up your design format properly to create a print-ready file.
2. Create Your Design For The Correct Canvas Size
Before you create your design, determine what dimensions you want the print to be. Then you can format your design accurately to how it will look on print. For instance, if you are creating a business card, but you have your design formatted for a flyer, you won’t be able to fit all the information on a small business card. Most design platforms allow you to create a customizable canvas size based on different dimensions. At Replica, we provide free templates for various print dimensions on our resources page.
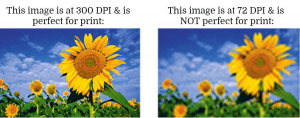
3. Save Your File With a Minimum Resolution of 300 DPI
DPI stands for dots per inch and it refers to the number of physical dots of ink printed in a printed document. When creating print-ready files, you always want to save your file with a minimum resolution of 300 DPI. A 300 DPI maintains the clarity of your design during the printing process.
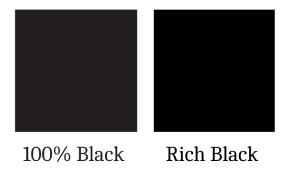
4. Use the Same Shade of Black Throughout Your Design
When designing on your computer, it is difficult to distinguish the different shades of black on the screen. However, you can see a noticeable difference between rich black and 100% black in print. Rich black creates a rich and deep shade of black while 100% black creates a duller and greyer shade of black. Maintaining the same shade of black throughout your design creates a cleaner appearance for your prints.
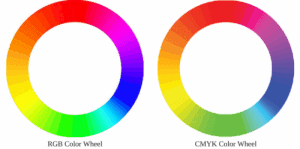
5. Design With CMYK Colors Rather Than RGB
While your computer screen uses RGB colors, your prints will be produced in CMYK colors. While the warmer colors look similar in RGB and CMYK, the cooler colors in RGB appear as a different shade in CMYK. By designing with CMYK colors, you can create your design with the colors that will be shown on your prints.
With these five design tips, your prints will be ready for production. At Replica, we offer free proofs to make sure that you’re satisfied with your prints before we start the production process. We also offer graphic design services to help you successfully transform your digital design to print. Contact Replica Printing for graphic design services today!